
A carbide rotary burr is useful when a casting flash, weld toe, sharp edge or irregular opening needs controlled local removal rather than a programmed machining pass. By matching the burr profile, tooth pattern, diameter and operating method to the workpiece, you can remove stock without turning a deburring task into an uncontrolled gouge or overheated surface.
Key takeaways
- Use rotary burrs for local stock removal files and milling cutters cannot reach.
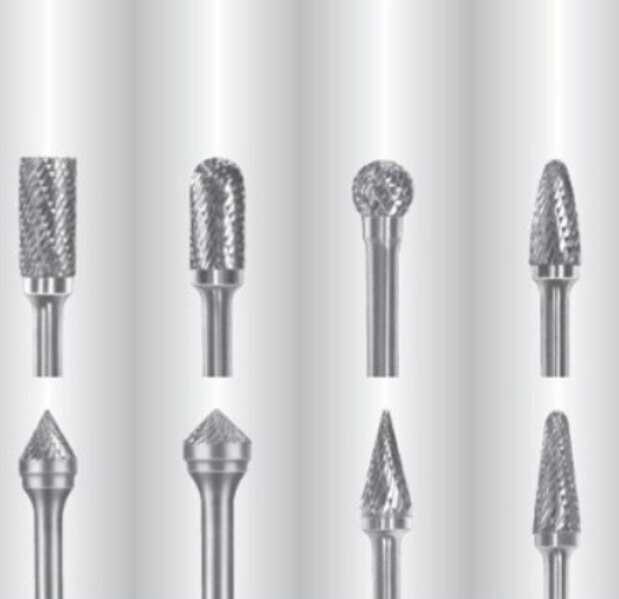
- Match burr shape to the feature: cylinders for surfaces, trees for corners and flames for contours.
- Use coarse teeth for aluminium and fine teeth for steel or controlled finishing.
- Keep the burr moving, use light pressure and avoid overheating the cutting edges.
Where carbide rotary burrs solve everyday shaping problems
A carbide rotary burr is best for irregular, local stock removal where a file is slow and a milling cutter cannot reach. Use it for removing casting flash and parting lines, breaking sharp edges, enlarging holes, dressing intersecting bores, blending welds and weld toes, and making small clearance or fit adjustments.
| Feature or job | Best burr profile | What it reaches |
|---|---|---|
| Casting flash and flat faces | Cylindrical | Broad flat areas and straight edges |
| Slots, shoulders and hole enlargement | Cylindrical with end cut | Slot walls, shoulder corners and the bottom of a blind recess |
| Concave blends and internal radii | Ball-nose | Weld transitions, bowl-shaped areas and bore intersections |
| Narrow concave radii and V-grooves | Tree | Recessed corners and tight internal curves |
| Contour shaping and weld-toe blending | Flame | Changing curves and gradual transitions |
| Small grooves and acute corners | Pointed tree | Narrow internal features and restricted corners |
| Rust, scale and rough surface buildup | Cylindrical or ball | Uneven deposits without needing a flat grinding wheel |
Use several light passes to control the contour rather than forcing the burr into the work. A burr is a hand-controlled shaping tool, not a replacement for milling when you need a datum, repeatable dimensions or a specified finish.
Clamp the part and support thin sheet; hooked edges and interrupted cast surfaces can grab the tool, damage the work or pull your hand toward the cutter.
Match the burr shape and size to the feature
Choose the profile by the feature’s shape and access, then size the burr to the stock you must remove. A large head removes material faster but cannot enter a narrow groove; a small head reaches farther into corners but needs lighter pressure and more passes.
| Profile | Best feature | Selection cue |
|---|---|---|
| Cylindrical burrs | Flat faces, slots and shoulders | Use an end-cut version when the bottom or shoulder also needs cutting |
| Ball burrs | Concave blends, internal radii and intersecting bores | Match the ball diameter to the radius you want to create |
| Tree burrs | Narrow concave areas, V-grooves and radii | Choose a pointed tree for a deep corner or acute internal feature |
| Flame burrs | Contours, curved transitions and restricted edges | Use the tapered nose for access, not for forcing into a sharp corner |
Select the cutting-head diameter slightly smaller than the available opening, then choose a head length that reaches the feature without making the tool unnecessarily flexible. Excessive reach increases vibration and reduces control; a short head is steadier on exposed surfaces.
Use a shank that matches the die grinder or rotary tool collet, commonly 3 mm or 6 mm, and seat it fully without bottoming out.
Check the manufacturer’s diameter-and-material speed chart before running the burr. Replace any burr with chipped teeth or a bent shank; do not dress damaged teeth by hand. Expect a burr to blend and deburr, not produce a precise datum surface.
Choose tooth geometry for the workpiece material
The wrong flute geometry turns a quick deburring job into packed teeth, excess heat and poor control. Match the burr to how the material breaks into chips, not simply to its hardness.
| Material | Preferred tooth geometry | When it applies |
|---|---|---|
| Aluminium | Aluminium-cut burr; single-cut burr for lighter work | Use open, large flutes for chip evacuation. A fine double-cut burr can suffer clogging when you dwell or press hard. |
| Steel | Double-cut burr | Crossed flutes divide chips, improve control and leave a more manageable finish than a coarse single cut. |
| Stainless steel | Double-cut burr | Keep the burr moving. Dwelling creates heat and work-hardens the surface, making the next pass harder. |
| Cast iron | Double-cut burr | The divided cutting action controls abrasive chips and suits flash, edges and rough surface cleanup. |
| Brass | Single-cut burr; aluminium-cut burr for gummy grades | Open flutes reduce clogging and carry ductile chips away from the cut. |
| Hardened steel | Double-cut burr | Use a sharp, rated burr with light passes. Forcing a dull tool overloads teeth and risks chipping. |
| Plastics | Single-cut burr or aluminium-cut burr | Choose an open flute to limit chip packing and melting; feed continuously instead of rubbing one spot. |
Select rpm from the manufacturer’s diameter-and-material chart. A larger burr requires a lower allowable speed, and neither the burr nor the grinder may exceed its rating. Remove chipped burrs from service; damaged teeth create imbalance and unpredictable impacts.
Set up the grinder and control the cut
Start with the holder, not the trigger: clean the collet and shank, inspect both for dents, and seat the burr with the shortest practical overhang. Poor collet fit or excessive tool runout creates vibration, uneven tooth loading and premature breakage.
Check the burr manufacturer’s diameter-and-material chart before cutting. The permitted spindle speed falls as burr diameter increases; never exceed the burr’s maximum rating or the grinder’s rating.
During the cut:
- Start the grinder clear of the workpiece, then bring the rotating burr into contact without striking a corner or entering a hole at an angle.
- Keep the burr moving and use light feed pressure. Forcing it sideways, twisting it in a deep cut or snagging a thin edge can chip teeth or break the shank.
- Make several light passes instead of trying to remove the full allowance at once. Change the angle gradually to blend a contour and avoid gouging.
- Use the side or end of the cutting head as its shape allows; do not bury the head where chips cannot escape.
- Stop if vibration rises, the cut grabs or the work becomes too hot. Reduce engagement, clear chips and check the holder.
A chipped burr, bent shank or damaged collet belongs out of service. Do not dress chipped teeth by hand; the resulting imbalance can create unpredictable impacts. If aluminium packs the flutes, use an aluminium-cut burr, suitable speed, light feed pressure and only the lubricant or wax recommended for that tool.
Select the right removal method for the finish you need
Choose the tool by the surface you must leave behind, not by how quickly it removes metal. A carbide rotary burr suits rough stock removal in irregular areas, a controlled chamfer, small-hole deburring and weld blending, but it is not a substitute for a milling cutter when you need repeatable dimensions or a datum surface.
| Option | Best result | Main limitation |
|---|---|---|
| Carbide rotary burr | Local shaping, flash removal, weld blending and controlled edge work | Hand pressure and angle change the cut; finish is operator-dependent |
| Mounted point | Small-area finishing and light deburring in hard-to-reach recesses | Removes stock slowly and the abrasive wears |
| File | Controlled chamfers and flat edge work | Slow on hard steel; poor access inside holes |
| Flap wheel | Smoothing welds and broad surface finishing | Rounds edges and cannot reach small holes cleanly |
| Angle-grinder disc | Fast rough stock removal on large welds and heavy scale | High gouging risk; unsuitable for precise edge control |
| High-speed-steel burr | Light work on softer metals at lower cost | Dulls sooner on stainless steel, cast iron and hardened material |
Use a file when edge geometry matters more than speed, and a flap wheel when a broad blended finish matters more than a sharp boundary. Choose a mounted point for polishing-sized recesses; use a carbide burr for localized correction and access.
R.S. Tools & Engineers Pvt. Ltd. can help you compare burr and finishing-tool choices against the metal, access and required edge break rather than selecting by shape alone.
Related products
 | ROTARY BURR Miranda Rotary Burr is a high-quality tool designed for precision deburring, grinding, and shaping operations. View product → |
 | Carbide Rotary Burrs Product Image Shape:Straight Product Type:Carbide Burrs Material:Carbide Color:Silver Usage:For Cutting, Shaping and Grinding Purpose View product → |
Frequently asked questions
Where are carbide rotary burrs used in metal shaping?
Use them to remove casting flash and parting lines, break sharp edges, enlarge holes, dress intersecting bores, blend welds and make small fit adjustments.
How do you choose a carbide rotary burr shape?
Match the profile to the feature: use cylindrical burrs for flat surfaces and slots, tree burrs for corners, and flame or oval burrs for curved transitions.
How does tooth geometry affect burr selection?
Choose tooth geometry according to the workpiece and finish. Coarser cutting action removes stock quickly, while finer teeth provide more control and a smoother finish.
How should you control a grinder with a carbide rotary burr?
Secure the workpiece, keep the burr moving, apply light pressure and use the grinder speed recommended for the burr diameter and material.